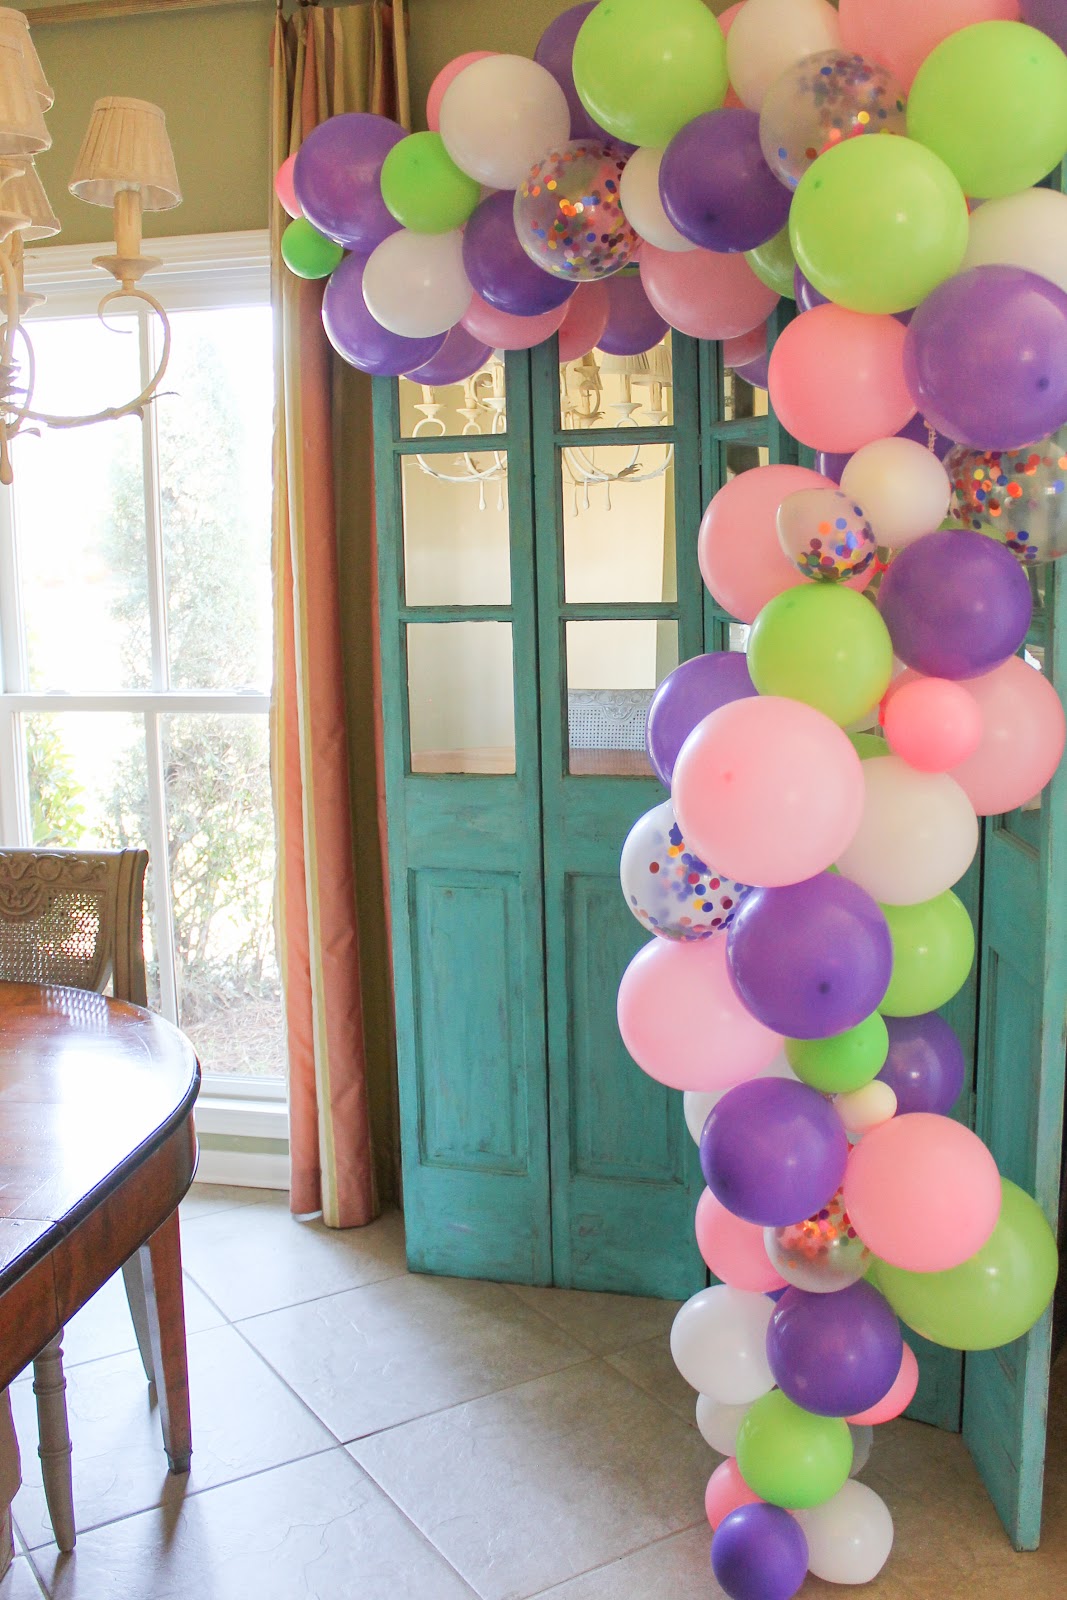
Balloons as party decorations has never been more popular
due to all the creative ways that folks have found to use them.
One of my favorite ways to use balloons that I have seen is
as garlands. I had hoped to make balloon garlands to celebrate
my daughter's birthday on a family vacation to the beach.
I wanted to experiment making a balloon garland to see if I
actually could. The internet has good tutorials on the garlands.
actually could. The internet has good tutorials on the garlands.
Actually, I was amazed that the garlands were so inexpensive
to make with easily obtainable items. There are lots of different
creative ways to put them together. I wouldn't be writing this
blog post if I had not found another way to create the garlands
that is cheap and works better for me than the other methods.
I was in Dollar Tree getting balloons for my trial garland and
saw rug grip pads there. It struck me that the holes in the rug
grip pads might be able to hold the balloons for a garland.

I got a couple of packs to try to use them to hold the balloons
for a garland. They were cut into strips about 1.25"...keeping
at least three holes across on each strip.

The pads are 18" x 28". I got about 12 strips 28" long.
If you joined all the strips together, that is about 24 feet of
balloon garland base from one pad.
balloon garland base from one pad.

To join the strips together overlap strips about 4 holes on each
end. Then use ribbon, fishing line, floral wire or other items to
join the ends together by weaving through the holes and tying off.


If you don't want to make your own base for a balloon garland
there are balloon strips available for purchase. Amazon, Party
City and Hobby Lobby have them (probably lots more but those
are the places I saw them available). Here is the one from HL...
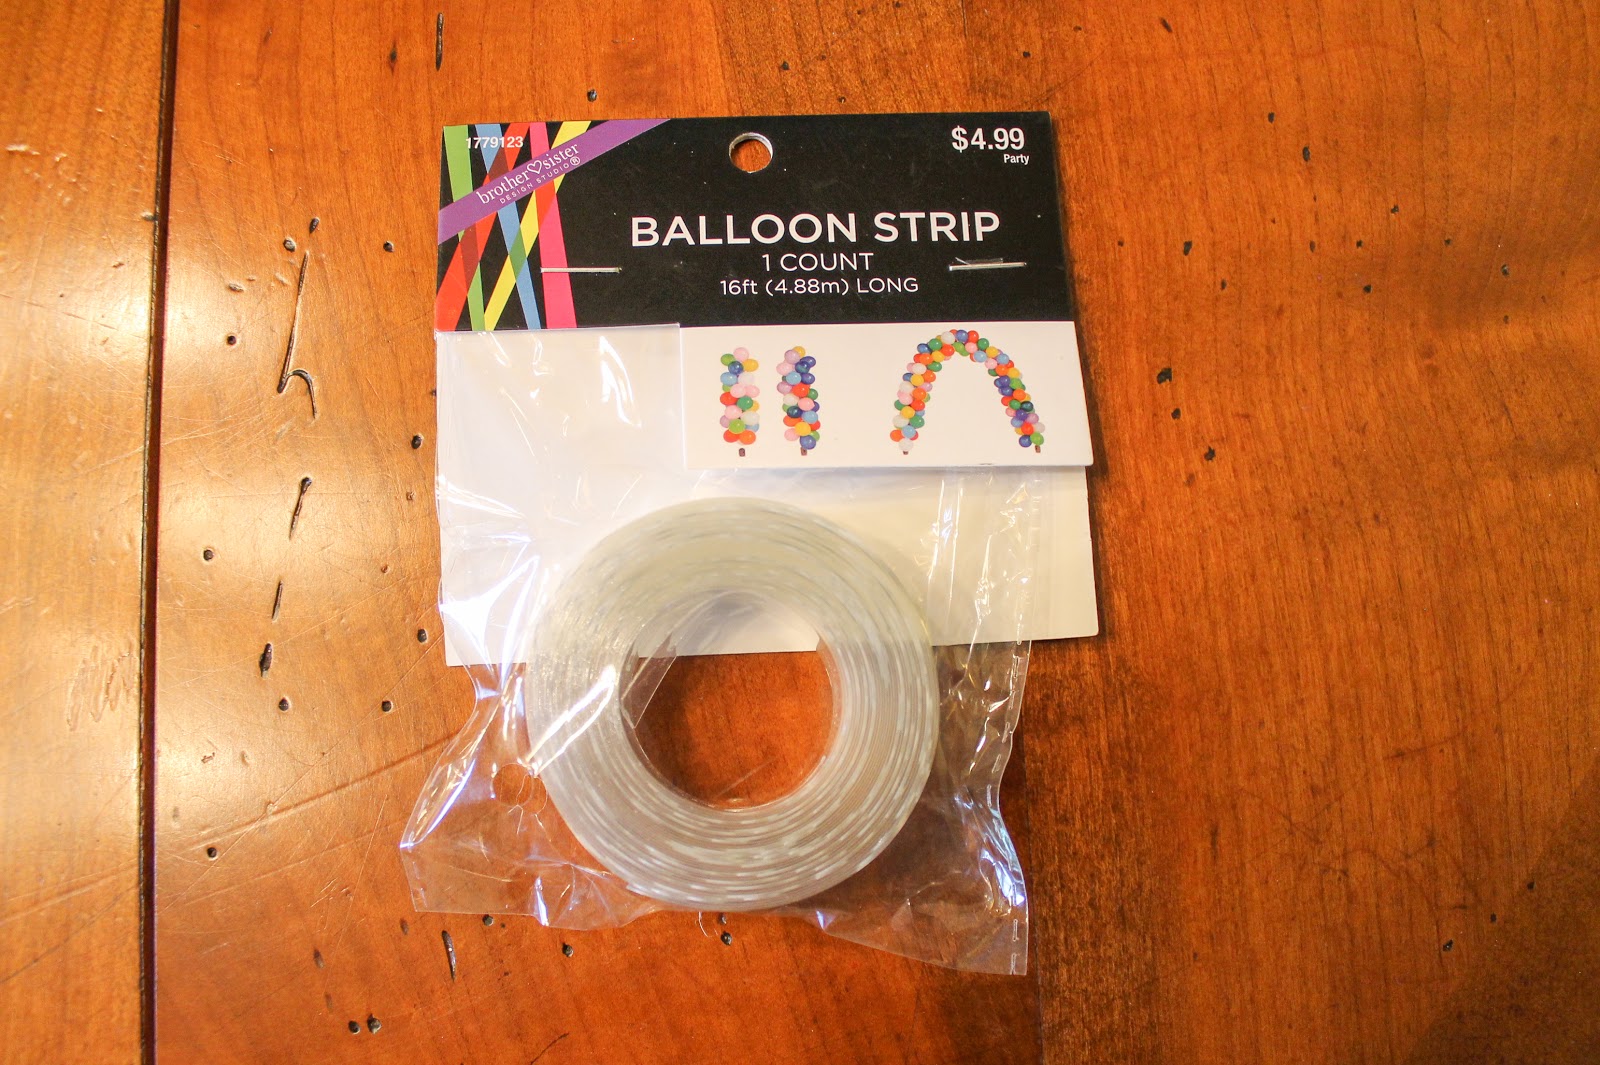

I did try this one from Hobby Lobby. It was pretty good but the
balloons tended to pop off of the strip more easily than the one
I made from the Dollar Tree rug grip.
Here are other things that you will incur costs on in making a
balloon garland...mostly balloons.
For the balloon garland pictured so far in this post, here are the
balloons that I purchased. The white and pink balloons are from
balloons that I purchased. The white and pink balloons are from
Dollar Tree so $2 for 30 balloons. The lime green and purple
balloons are from Hobby Lobby...25 balloons per pack for $1.59.
The confetti balloons (also HL) are 8 for $1.59.


These things are optional but purchased from Dollar Tree so $1
each...balloon pump, two 3M hooks, double stick tape. I didn't
count these in the $10 cost. In reading other posts about balloon
garlands, some had suggested double stick tape to add small
balloons to hide blank spaces. It did not work well for me.
count these in the $10 cost. In reading other posts about balloon
garlands, some had suggested double stick tape to add small
balloons to hide blank spaces. It did not work well for me.

For my $10 tabulation I figured $6.50 on balloons, $1 on rug
grip pad (24 feet of base for garland), $1 for ribbon
(Dollar Tree) to tie the lengths of cut rug grip together.
(Dollar Tree) to tie the lengths of cut rug grip together.
The non-fun part of balloon garlands...blowing up balloons.

Leave at least a foot of (whatever you are using as a) base of
the garland free of balloons to be able to attach it to the
surface where you are hanging the garland.
Pull the neck of the balloon through the base you are using.
Pull the neck of the balloon through the base you are using.

For the rug grip base I used the middle hole to attach the
balloons so it would be less likely to break than the edge holes.
I actually never had a break.

I learned this as I went along... after pulling the knot through
one hole, pull the "nozzle" (very end balloon...rolled circle)
through an adjacent hole also. That extra step in not mandatory
but I never had a balloon pop off after doing that.
but I never had a balloon pop off after doing that.
Vary the colors of the balloons if you are using different colors
of balloons as you attach them down the base.
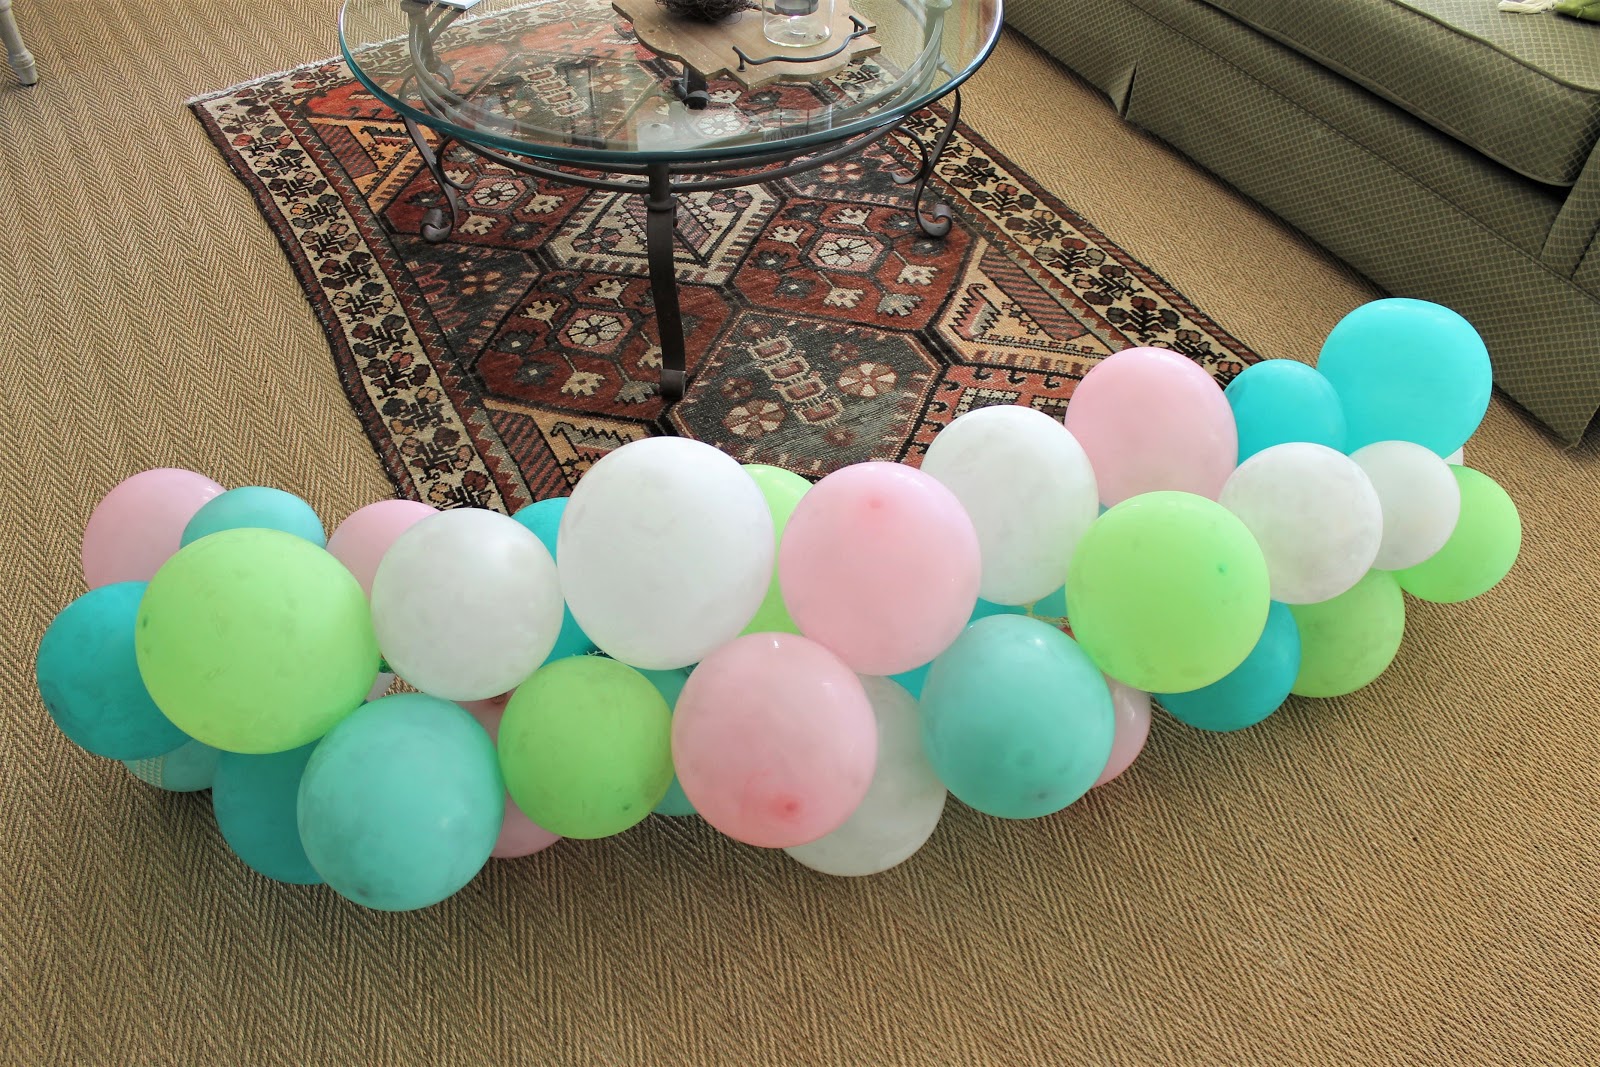
Here is the first few feet of the garland as I started my trial...

The more footage I worked along attaching balloons, the
better it looked. You can also vary the sizes of the balloons
without purchasing different sizes by not blowing all the
balloons to their maximum size.

Whatever base you are using, don't use all the holes.
Skip three to six holes between balloon attachment.
Skip three to six holes between balloon attachment.
There are probably other ways to hang your balloon garland when
you get it the length you want it but I used Command hooks.

Use the end of the garland base without balloons to attach to
the hook. With the balloon garland there is a lot of pressure
from all of those balloons being so tight together. I did not
have a helper but I would suggest you trying to get one for
the hanging part.
the hook. With the balloon garland there is a lot of pressure
from all of those balloons being so tight together. I did not
have a helper but I would suggest you trying to get one for
the hanging part.
You may need to use tape or other devices to keep the garland
ON the hooks, nails or what ever you decide to attach it to
the wall with. My first hook ended up being a hot mess.

For attaching the other side of the garland I opted to use another type of command hook upside down. This one (used upside down) was able to hold the garland without using tape to keep it secure.
I just pushed the hook through one of the holes in the rug grip base.
I just pushed the hook through one of the holes in the rug grip base.

For this garland I used a hook on each end of the mirrored
screen to attach it. I made it extra long on purpose
so part of the garland could drape down.


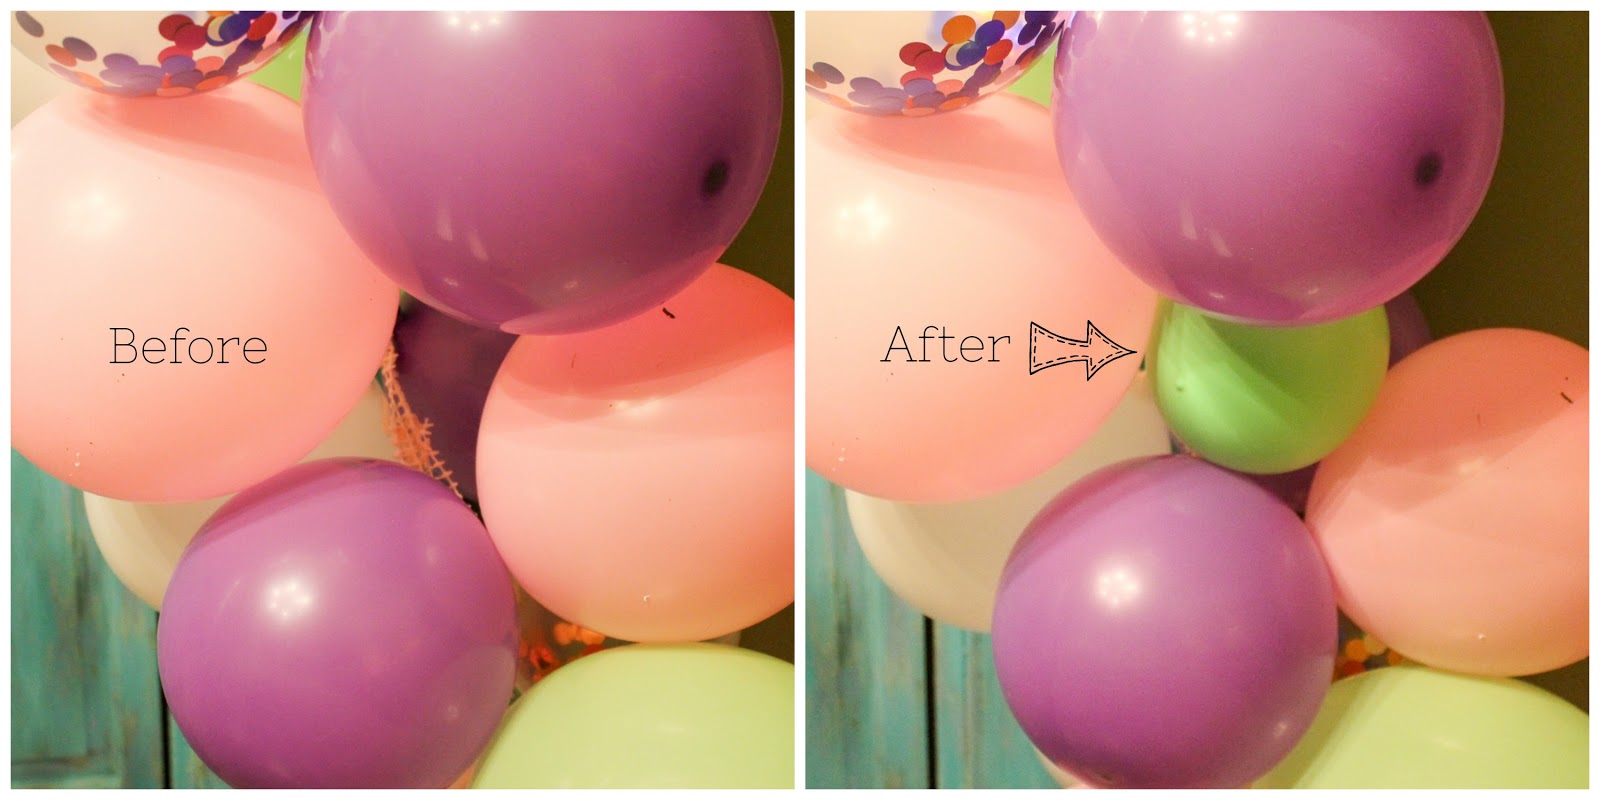
Even if you have tried to vary the colors of the balloons as you
are attaching them to the base, after you get it up you may have
too many of one color showing to the front. After you have the
garland attached, you can gently pull some of the balloons
to the forefront of the garland to get the look you want.
Also if you have spaces where the base/spine/strip shows
through, you can use an extra balloon not blown up all the
way to camouflage it.
If the little balloon does not stay in place by itself you can try
double stick tape or glue dots to more securely attach it.
I actually had the best luck by using the tape or glue dots for
temporarily holding it and adding clear glue at the contact
points for long-lasting attachment.


Well...I did love my experimental balloon garland but
I gave it to a neighbor girl to enjoy it, which she did.
After my balloon garland success I got more balloons
but in ocean colors for the anticipated beach birthday party
(which never happened due to the virus outbreak).
To try use the balloons, I started making balloon
garlands as backgrounds for Zoom virtual birthday
parties with my grandchildren.
To try use the balloons, I started making balloon
garlands as backgrounds for Zoom virtual birthday
parties with my grandchildren.
I ran out of time for the first Zoom birthday party.
I only got the ends done...I call these balloons bundles.

That might be an option for someone that does not need an
entire balloon garland. Balloon bundles use the same
construction concept but just shorter base and less balloons.


For the next Zoom birthday party I did get the entire balloon garland done. I added in some pink balloons to tie in with the pink/red poster. It was only a vertical garland but it was festive.


I'm telling you...these balloon garlands have a lot of life...they
are not easy to contain/lay flat. Just plan on some dimension.
are not easy to contain/lay flat. Just plan on some dimension.
Here are the balloons for the grandchildren/Zoom/vertical
garland. Some colors are leftovers from the other garland.
No confetti balloons for this one.

Here are the Command hooks used again. I used tape to secure
the garland to the hooks. Here you can see how flexible and
strong the garland base is that is made from the cut up rug grip .
strong the garland base is that is made from the cut up rug grip .

To hide the hook and the base/spine of the garland I added two
partially inflated balloons. They stayed in place initially by
adding glue dots to attach them to adjacent balloons (not
trying to attach them to the base) but they were on the
floor by the morning.
adding glue dots to attach them to adjacent balloons (not
trying to attach them to the base) but they were on the
floor by the morning.
By pushing them in again and adding clear liquid glue at
the contact points they stayed in place for over 10 days.

Same on the other side of the garland/hook set up.


If you have a blank space once you get the garland up, you
can gently pull/push the balloons to try to hide the base.


Wonder how long your garland will last?
I needed to take the garland on the mantle down to put up
a more serious backdrop. Here is the garland after 10 days.
The balloons are still perky but maybe have lost a little
color. Tip...if you are making a balloon garland for a party,
you can make it a couple of days ahead of time and it will
still look good for the event.
you can make it a couple of days ahead of time and it will
still look good for the event.
I worked on the balloon garlands in spurts so I don't know
exactly how long it took me to make them. The first and
longest garland was probably four or five hours.
The shorter one was about two hours. If you have a helper
the garlands will go much quicker.
This might be a fun project to try with the kids if you are
looking for an inexpensive activity at home even!
Here is an image you can put on Pinterest if you
want to save this for future reference.